An SSL certificate protects the privacy and security of you and your website visitors. This guide will show you how to view your domain’s SSL cert, which we include for free with all domains on WordPress.com.
In this guide
SSL (Secure Sockets Layer) is the global standard in encrypted online security technology. An SSL certificate reduces the risk of malicious players (hackers or identity thieves) stealing sensitive information like credit card numbers and passwords from a website visitor or the website itself. Essentially, it provides safe, encrypted communication between your computer and the website you’re visiting.
SSL certificates on WordPress.com come from the Let’s Encrypt Certificate Authority. All certificates on WordPress.com use the same Common Name, tls.automattic.com, and store the unique domain names (grouped in batches of about 50) in the SubjectAltName attribute. All modern browsers honor this attribute, so you and your visitors will not encounter any security warnings on your site.
TLS is the upgraded version of SSL, although the terms SSL and TLS are often used interchangeably. WordPress.com supports TLS versions TLSv1.2 and TLSv1.3.
WordPress.com also sends a Strict-Transport-Security (HSTS) header with all our HTTPS responses, ensuring your site is accessed via https instead of the less-secure http.
On WordPress.com hosted sites, SSL is provided free of charge and automatically provisioned (installed) for you. It is not possible (or necessary) to install an SSL certificate from another source — we automatically encrypt all domains registered and connected to a WordPress.com website. Although it’s common for WordPress site owners to install (and pay for) their own SSL certificate, we take care of this for you on WordPress.com.
Our automated process adds an SSL certificate shortly after the domain is registered, transferred, or connected to your WordPress.com site. It may take up to 72 hours for the SSL certificate to appear on your site.
For domains connected to WordPress.com from other registrars, SSL certificates are added after you complete the connection process.
To make sure your domain has an active SSL certificate, take the following steps:
- Visit your site’s dashboard.
- Navigate to Upgrades → Domains (or Hosting → Domains if using WP-Admin).
- Click on your domain.
- Scroll down to the “Domain security” section.
- Check for the text “SSL certificate active”:

You can also check if a site has a working SSL by checking the URL in your browser’s address bar when visiting the website as a normal visitor. Browsers typically show a lock icon, safety seal, or a green URL bar to indicate a secure connection.
As long as your domain is displaying your WordPress.com site, we will automatically generate the SSL certificate. If you see an SSL-related issue or error message, review your domain’s DNS records to ensure the domain can display your WordPress.com site (and receive the SSL).
Example errors you might see when visiting your site include NET::ERR_CERT_COMMON_NAME_INVALID, or Your connection to this site is not secure.
For domains registered with WordPress.com or transferred to WordPress.com, check your DNS is correctly configured with the following steps:
- From your site’s dashboard, navigate to Upgrades → Domains (or Hosting → Domains if using WP-Admin).
- Click on your domain name.
- Click on the “Name Servers” section and ensure the option to “Use WordPress.com name servers” is in the ON position.
- Click on the “DNS Records” section and click the “Manage” button.
- Ensure that your domain’s A and CNAME records are set to the default values for WordPress.com by:
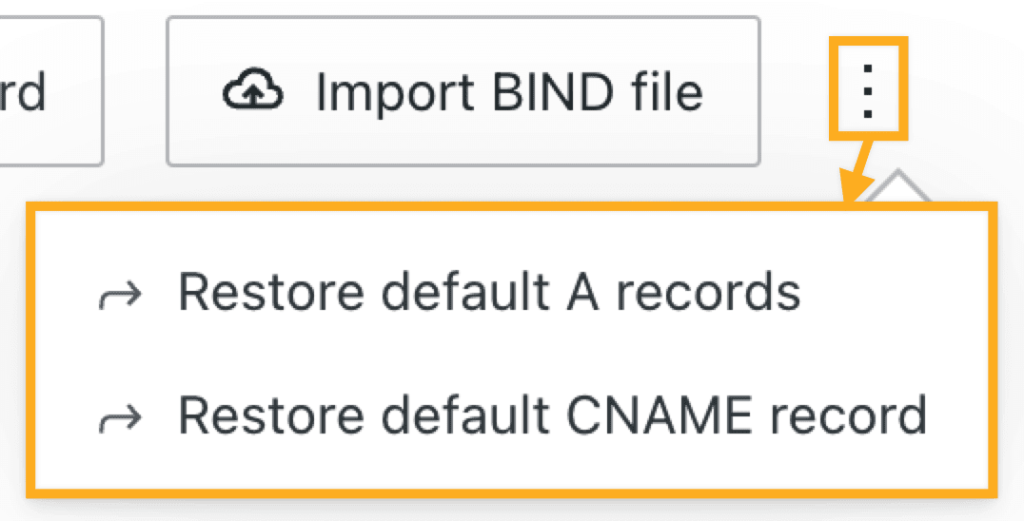
- Clicking the ellipses (three dots) at the top right of your screen.
- Clicking “Restore default A records” and/or “Restore default CNAME record”:
Once you have completed these steps, your WordPress.com site will appear on your domain within a few hours, and SSL applied shortly after.
If your domain is connected from another registrar, ensure that you have completed the domain connection to receive the WordPress.com SSL certificate.
You do not need to take action to renew your domain’s SSL certificate. It is renewed automatically when you renew your domain. Your SSL certificate will remain active as long as the domain is connected to a WordPress.com site.
We consider strong encryption so crucial that we do not allow you to compromise the security of your website by disabling SSL. We also 301 redirect all insecure HTTP requests to the secure HTTPS version.

