A screenshot is an image that captures what appears on your computer screen. No matter what type of device you use, you can create a screenshot by following the steps in this guide.
In this guide
In the following sections, we’ll share how to make a screen shot for all major types of computers and phones.
To take a screenshot on a Windows computer or laptop, use the Snipping Tool that comes with your computer:
- Select the Windows Start button.
- Search for the Snipping Tool and click to open it.
- Click on the “New” button.
- Click and drag your mouse around the area of the screen you wish to capture in an image.
- The screenshot is automatically copied to your clipboard, for you to paste into an email or other program. You can also click the Save button to save the image file to your computer.

Mac users can use one of the following keyboard commands to take a screenshot:
- To save a screenshot of your entire screen, press CMD + Shift + 3.
- To select a particular area of the screen for your screenshot, press CMD + Shift + 4.
Once you press one of the key combinations, your screenshot will be saved to your files.
Use the keyboard shortcuts below to take a screenshot.
Ctrl+  | Take a screenshot of your current window |
| Ctrl+ Shift+ | Take a partial screenshot by selecting the area you want to capture |
Once you’ve finished taking a screenshot, you can then retrieve the image file in the Files app. To access the Files app, click the apps list button  in the launcher, then click the Files icon.
To take a screenshot on Linux, press the Print Screen key (depending on your keyboard, the key might be marked “PrtScn“) Alternatively, navigate to Applications → Accessories → Take Screenshot.
Save the image as a JPG, GIF, or PNG file.

You can take a screenshot on your iPhone or iPad in a couple of steps.
If you have an iPhone or iPad with a Home button, press the Sleep/Wake button at the top or the side of your device and the Home button on the front of your device at the same time. The image will be automatically saved to your Photos app. You can then send it via email or upload it to your site via the WordPress app.
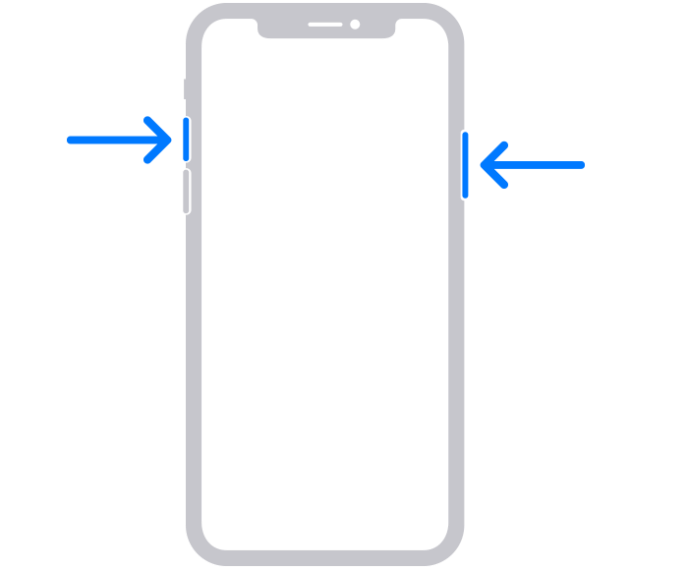


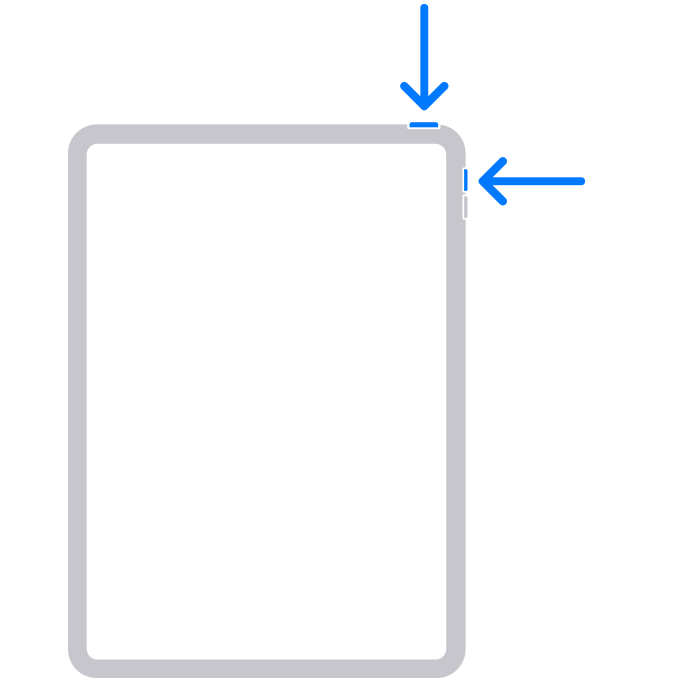

If your iPhone or iPad does not have a Home button, you can press the Sleep/Wake button on the side and the Volume Up button at the same time and quickly release both buttons. The image will be automatically saved to your Photos app. You can then send it via email or upload it to your site via the WordPress app.
For the majority of Android devices, you can press and hold down the power and volume-down buttons together for three seconds. For Android devices with a physical Home button, press and hold the Home and volume-down buttons together for three seconds.
If these options do not take a screenshot, please check your device manufacturer’s user guide for specific instructions regarding taking screenshots.
The screenshots can be accessed from the Gallery on your Android device, where they can be shared, edited, or deleted. You can send it via email or upload it to your site via the WordPress app.
Once you have taken your screenshot using one of the above methods, you can use it as you would any image. For example, you can:
- Add it to a post or page.
- Attach it to your email to support.
- Upload it to your media library, and give out the URL to your image.
- Upload the screenshot to a third-party service like Snipboard.io, Droplr, or CloudApp, and then share the image link from that service with support.

