Your WordPress menu is the list of links that are typically displayed at the top of your site. Our guides will show you how to add and edit your site’s menu settings.
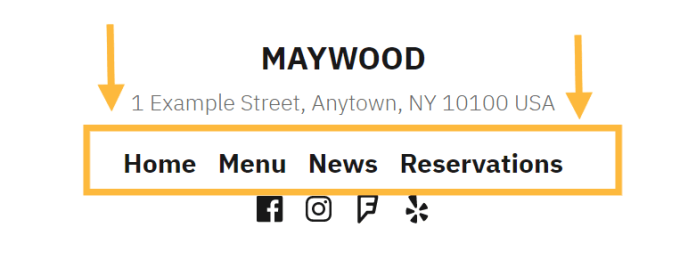
A menu (also called navigation) makes it easy for your visitors to find their way around your website’s pages and other content. A menu is commonly displayed prominently in the site’s header or sidebar.
The menu displays links to your site’s pages. It’s generally recommended to keep your list of pages short to avoid overwhelming the user. If you have a lot of pages to feature in your menu, you can use submenus (also called dropdowns) to keep your navigation links neat and organized.
The process for editing your menu will depend on your WordPress theme.
To find your menu settings, visit your dashboard and check under Appearance on the left side.
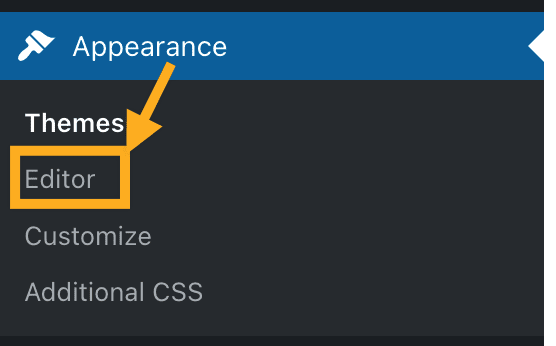
If you see Editor under Appearance:
- Navigate to Appearance → Editor.
- Create or adjust your menu using the Navigation block.
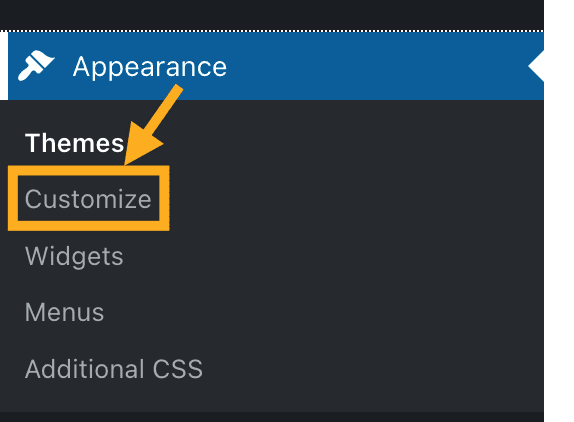
If you do not see Editor under Appearance, click Menus or Customize → Menus to create and edit your menu in the classic WordPress experience.
Our guides below contain step-by-step instructions for both methods of managing your site’s menus.
Our dedicated menu guides will help you create, edit, and organize your website’s navigation menu:
Create a Menu
When you start a new site, a menu is created for you automatically. However, if you need to create a new menu from scratch, this guide will show you how.
Add Links to a Menu
A menu contains links to pages, blog posts, and other content so that your visitors can easily navigate around your site. This guide will show you how to add links to your menu.
Add Categories to a Menu
As a blogger, it’s common to include categories in your menu so that readers can view posts for a specific topic on your blog. This guide will show you how.
Create Drop-Down Menus
This guide will show you how to add drop-down menus (or sub-menus) to your menu.
Reorder Menu Items
This guide will show you how to rearrange your menu items to be listed in the exact order that you want them to appear.
Create a Social Links Menu
Many themes come with a built-in Social Links Menu to show attractive icons that link to services like Twitter and Facebook so that visitors can find you on social media. This guide will show you how to set up your theme’s built-in social links menu.
Customize the Menu Design
This guide will show you the various ways you can change the menu’s design.
Advanced Menu Settings
Once you have created a menu and added any pages, category pages, or custom links you like, you may want to check out these advanced menu capabilities to get the most out of your menu.
Delete a Menu Item
This guide will show you how to remove items from your menu and delete a menu entirely.

